|
Measures can be of different lengths to accommodate different rhythms. The initial measure length is specified at the beginning of the piece. It takes the form of a fraction, the upper number expressing how many beats in each measure, and the lower one the length of each beat. Here’s how it looks:

This indicates four beats to the measure (the upper number). The lower number specifies that each beat has a duration of a quarter note. We call this “four four time.” This is the most common time in music, so is often shown by the abbreviation

The three on top indicates that there will be three beats. The eight below shows that each beat will last an eighth note. We would refer to this as “three eight time.”
How to Count Time
Knowledge of the mathematical lengths of the notes is only useful upto a point. More important is how to relate these to the onward flow ofthe music, and this is done by counting the beats. It is the same asbeating time to music that you hear—you respond to the beats and tapyour foot accordingly. But when you become the player, you have toestablish your own beat to set the time.
Here are some examples to put this into practice:
First count these measures evenly as shown, with a slight extra stress onthe first beat of each one.

Now try these measures with varying note lengths. See if you can tap out the notes while
keeping an even count., i.e.:

Here is an example in 3/4 time. Notice the dot after the half note which increases its time by half again. Thus, it gets three counts instead of two:

Now let’s try this with the guitar, playing the tablature notes instead of just tapping. Use alternating rest strokes for the melody (counting practice #1):

It is very important to try to count at the same time as you play. It seems a lot to remember at this stage, but if you try it a few times you will find it becomes quite natural. This will help tremendously later, when you start reading regular music notation. Now here is an example in 3/4 time (counting practice #2):


Be careful in the second to last measure, where the rhythm is a little different.
Read more...!
The length of individual notes is easy to express simply by having a different symbol for each length. Also, it is necessary to specify periods of silence when required between notes. These silences are called rests, and they have symbols corresponding to the duration of the notes. Here are the common ones.


As previously mentioned, music is conventionally divided off into measures or bars. We usually prefer to use the term measure, because, as we shall see later, bar has an alternative meaning in guitar music.
Read more...!
Written music can serve many purposes. It can help us remember what we have heard oncebefore. But it can also help us learn something we’ve never heard—and thus expand ourmusical horizons.
Luckily, guitar tablature—the easiest way of writing down music for the guitar—is simple tounderstand, once you know the basics. It can be your doorway to an entirely new world ofmusic. So let’s spend a few minutes familiarizing ourselves with the basics of tablature.
Guitar Tablature
In the earliest days, music for the guitar was written in a form known as tablature. Thissystem indicates exactly where the fingers are to be placed by showing the strings as six lines,with numbers (or letters) representing the frets. Here is an example:

- The word TAB is conventionally placed at the beginning of the line to distinguish these lines from those of the musical staff. Here, the lines represent the six strings, the first string being the top line.
- “0” stands for open string. Play the first string with the right hand; do nothing with the left.
- “1” stands for the first fret. Place a finger behind the first fret on the same string. Play the note.
- “3” stands for the third fret. Finger the third fret, play the note.
- The vertical line marks off the measures, as in conventional notation.
Note that the numbers have nothing to do with the fingers. In this example they happen to coincide, but they refer only to the frets.
Now try playing these examples in succession:

If something sounds familiar, you’re doing well!
The rhythm can be expressed in various ways in tablature, but before discussing this we need to learn some basics in this area.
Read more...!
When the notes of a chord are played in succession rather than together the expressionarpeggio is used.
At its simplest, an arpeggio can mean simply playing the notes of the chord one after theother. For the upward arpeggio this can be achieved with precision if the notes of the chordare prepared in advance.
Here is how to do a simple upward arpeggio with open strings:
- Prepare both hands as if to play a chord
- Play the sixth string with the thumb, without moving the fingers. Do a rest stroke, andleave the thumb on the fifth string. This helps to support the hand.
- Play the index finger note (the third string), leaving the middle and ring fingers inplace. Use a free stroke.
- Play the middle-finger note (the second string), leaving the ring finger in place. (This ismore tricky.)
- Finally, play the first string with the ring finger.
- Replace thumb and fingers, ready to start again.
Here is a pictorial representation of the movements.
 After all fingers are prepared the thumb plays. After all fingers are prepared the thumb plays.
 Next, the index finger plays, leaving the others in place. Next, the index finger plays, leaving the others in place.
 The middle finger plays, without any movement of the ring finger. The middle finger plays, without any movement of the ring finger.
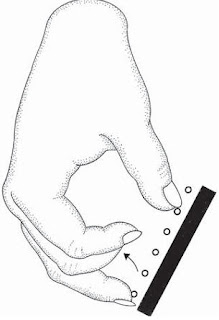 The ring finger plays. The ring finger plays.
The right-hand fingers are usually indicated by the first letters of their Italian or Spanish
names. They are easy to remember since i and m are used for the index and middle fingers.
For the ring or annular finger a is used, and the thumb is represented by p (for the Spanish
pulgar). Thus the right-hand fingering for the above arpeggio would be p-i-m-a.
p thumb
i index
m middle
a annula
r (ring) finger
Practice the p-i-m-a arpeggio until you can do it smoothly, and then try it on the otherchords, remembering to use the thumb on the appropriate strings. Choose the lowest one forthe thumb and the top three for the fingers.
For the reverse arpeggio p-a-m-i, it is not necessary to place all the fingers in advance. Just theoutside fingers, p and a, are sufficient.
After becoming reasonably familiar with the physical movements involved for chords,arpeggios, and single-note alternation, it is time to play some actual tunes and accompani-ments, and to do this we need to learn ways that the tunes can be written down. Then wecan move on to learning songs and chording.
Read more...!

The free stroke is used in chords, in arpeggios as demonstrated below, and in single-notesituations where the rest stroke is not practical. It differs from the rest stroke in that thefinger comes clear of the adjacent string at the end of the movement.
Successive notes played with the free stroke use alternation in the same way. Try playing theexercise that you did with the rest stroke and you will notice the different sound. Goodplayers are able to develop a full sound that almost has the quality of a rest stroke.
Read more...!
As a general rule, the same finger does not perform successive rest strokes. It takes too muchtime to prepare the same finger for a second stroke when another finger could be ready tostart. The commonest way to play a passage of single notes is to alternate the index (i) andmiddle (m) fingers. The motion is like walking the fingers in place—as one plays, the othermoves back to be ready for the next note.
Practical Work
As a first experiment, try playing a succession of notes on the top string, starting with i andalternating with m. Try to keep the notes even and matching each other in sound. Then dothe same thing starting with m.
Note that some players, particularly those specializing in flamenco, develop a preference forstarting single-note runs with a particular finger, usually i. This is in fact counterproductivebecause the best finger for starting a run depends on the specific passage.
Now try the second string, playing i-m-i-m-i-m-i-m, then m-i-m-i-m-i-m-i.
Finally, do the same practice on the third string.
After that, try the same exercise that you did with the left hand alone, playing the first fourfrets of each string, this time with both hands.
When you reach the highest note, come back down the guitar playing the frets in the orderfour, three, two, one on all the strings. This makes an excellent daily warm-up exercise.
If you try the string changes reversing the fingers, i.e., using i-m where I have suggested m-i,you will find making the change from string to string harder. This is a basic principle offingering—where possible, we cross strings as shown above. However, we need to be able todo it both ways, because the easy method of crossing is not always practical.
Read more...!
Up to now, most of what we have covered could be played with a pick, but we will bestudying arpeggios that are much easier to play with the fingers. For the single-note melodiesthat follow, a pick could be used, but now is a good moment to learn the principal strokerest stroke.used for melody lines on the finger-style and classical guitar, known as the rest stroke.
The rest stroke is the technique that produces the fullest sound from a single note. It isplayed by plucking the string in such a way that, when the movement is completed, thefingertip comes to rest on the adjacent string—hence the name.
Here are the steps:
- The fingertip is placed on the string in preparation.
- As the nail passes the string it catches and sounds the note.
- The fingertip ends the movement on the next string.
- notIt is most important to keep the finger slightly curved—do let the joint yield as thenail plays the note, because this will weaken your attack.

The rest stroke is quite a subtle movement, because small adjustments can mean a consider-able improvement in tone quality. It is fun to experiment with this, and good habits devel-oped at this stage will ensure maximum progress. Take a look at it now from another angle.This picture shows the nail sliding off the string at a slight angle, with the finger slanted soas to engage the string with less-than-maximum nail. This change in axis from a head-onapproach softens the attack of the finger to produce a more delicate sound.
 Try these movements out now to see if you can produce a full and beautiful sound. Remem-ber that the state of the nail is important since rough areas will catch and produce a gratingsound. Try these movements out now to see if you can produce a full and beautiful sound. Remem-ber that the state of the nail is important since rough areas will catch and produce a gratingsound.
Here are the main points to remember: - Prepare to play by positioning the finger on the fingertip with the nail projecting overthe string.
- Press the string down slightly before playing.
- For a strong attack, play with more nail, i.e., with the center of the nail.
- For a subtler sound angle the nail and the stroke.
Read more...!
Now that you have some playing experience under your belt, we can move ahead to somemore interesting playing styles. This chapter covers the basics of playing individual notes,rather than just strumming chords. To learn to play melodies, we have to learn more sophis-ticated right-hand playing techniques.
This chapter introduces two of the more common styles of playing individual notes: the reststroke and the free stroke. By learning these techniques, you will be able to play notescleanly and easily, with a full sound. These techniques will lay the basis for all of your futureplaying, so we will break down their components so you can quickly understand and masterthem.
Read more...!
This is a good time to review what you have learned so far, since the early instruction is fairlyintense and there is much to remember. Answering these questions will help the memory.
- Why use the classical position at this stage ?
- What are the important points related to positioning the guitar ?
- Can you play the C, F, G7, Am, and Dm chords ?
- Are chords played with the fingertips or the nails ?
- To see your hands, should you lean your head forward or pull the guitar back ?
- What is a bar line? Why is it used ?
The Least You Need to Know
- Holding the right hand over the strings in the proper position will help you play moreeasily.
- Classical guitar players need to keep their nails carefully shaped, just long enough toplay the strings.
- How to play simple chords.
- How to add rhythm to your chord progressions.
- How to play in waltz rhythm.
Read more...!
Once you can do the waltz pattern, try changing the chords from C toG7 and back again. You will find that this is actually easier thanplaying full chords, because initially you only have one string to find.However, it is good to prepare the complete chord with both hands.
Next you can try an actual piece—the popular folk song “Clementine.”As practiced, the first beat is with the thumb followed by the twochords with the fingers. Notice that the music is divided off by verticallines known as bar lines. The space between the lines represents the barsinto which music is divided. The divisions make it easier to keep trackof the rhythm and stress, because there is a slight accent on the firstbeat of each measure.
If you know the song “Clementine,” try humming or singing along. If not, just play thesuccession of chords as shown. Where you see the chord name play the thumb, then the twochords.

Now see if you can fit the chords to the chorus without all the beats marked.

Read more...!
Varieties of rhythm, be they blues, waltz, or juapango, are introduced by the varied move-ments of the right hand. A good pattern to start with is the familiar “oom-pah-pah” of waltzrhythm.
Returning to the C chord, we will play first a single note, the fifth string, with the thumb.Then the index, middle, and ring fingers will play the top three strings together.
Here are the main points:
- First, find the notes with the left hand, and with the right handrest the thumb and three fingers on the strings to be played.
- With the thumb, don’t let the joint bend. Push forward andupward so as to clear the fourth string. Then bring the threefingers out to clear the strings, sounding the notes with the nailsas you move through.
- Once you can do the movement, play the thumb once and thefingers twice to a count of three. Emphasize the first beat (thethumb stroke) slightly more than the fingers, counting ONE-two-three, ONE-two-three, ONE-two-three, etc.
Read more...!
When using a pick or simple thumb strums, the focus is mainly on playing all the availablenotes of a chord. However, as you progress you will find that you want to select certainnotes, and not necessarily those on adjacent strings. This can best be achieved by using thethumb and fingers of the right hand.
To play a chord with the fingers and thumb, first prepare the right hand by selecting thestrings to be played. Then squeeze the thumb forward and the fingers back to sound thechord. As the fingers play they will naturally curl upwards, and the thumb will travel slightlyupwards and toward the first finger. However, it is not necessary to pull the hand away fromthe strings, particularly when a succession of chords is to be played, because the hand mustquickly be back in position to select the notes for the new chord.
The illustrations show the preparation and completion positions of the chord.
 The fingers prepare toplay a chord (left). Thefingers after the chordhas been played (right). The fingers prepare toplay a chord (left). Thefingers after the chordhas been played (right).
As a practice, try each of the chords you know, choosing the top three strings with thefingers and the lowest note of the chord with the thumb. Remember to ignore the stringswhere there is an X. Try for a clear, ringing sound
.
Read more...!
With a nylon-strung classical guitar, the best sound is produced byplaying with the nails. The right-hand nails should be long enough tocatch and play the string, but no longer, because a long nail is animpedance and is more likely to break. As a guide, when you look atyour hand with the palm facing you, you should see a ridge of nailprojecting just above the fingertip and following its contour.
The nails should be shaped with a “diamond dust” or similar nail file,and after shaping a very fine finishing paper (600 grade or better) maybe used to polish off any rough edges. The result will be a pure tonewith no scratch to it.
Read more...!
It is important to establish a good playing position for the right hand at an early stage.Notice the position of the knuckles, running along the same line as the strings and not atright angles to them. Then see if you can position your hand so that—as you look down—you see the triangle formed between the thumb and first finger. The weight of the arm istaken on top of the guitar; don’t let the elbow slide over to the face because this turns thehand into a bad position.
This section is very important for your future progress, and as you are the teacher as well asthe student, you should check your position frequently in the early stages.


Read more...!
The reason that we’ve chosen to learn the C, F, and G7 chords is that these three chords arecommonly used to accompany many, many songs. In fact, there’s an entire series ofsongbooks published using just these three!
Minor Chords
Before moving on to work on the right hand, try these additional chords for further practice.Notice that the letter m beside a chord name denotes a minor chord. The plain letter (C, G,etc.) denotes a major chord. Major chords tend to sound brighter and more cheerful, whileminor chords have a more melancholy association. Practice in the order Am, Dm, E7, Am.
 As you play these chords, try again to see the “family” relationship between them. Noticethat the E7 leads naturally to the A minor. Try to become really familiar with these chords,because we will soon be coordinating them with the right hand to play some songs. As you play these chords, try again to see the “family” relationship between them. Noticethat the E7 leads naturally to the A minor. Try to become really familiar with these chords,because we will soon be coordinating them with the right hand to play some songs.
Read more...!
Changing chords takes a lot of practice at first, because the new chord must be found fromscratch as quickly as possible. To make this easier, it is important for the fingers to take theshortest route possible from the one chord to the other, while maintaining the generalposition of the left hand. First, try the G7 chord a few times by itself so as to become familiarwith it.

The G7 chord
Notice that the G7 chord uses all six strings.
The next stage is to play a C chord, change to the G7, then back to the C. Here are the pointsto watch:
- Notice that the first finger only has to move a short distance, from the second string tothe first. In the same way the second and third fingers also only have to move a dis-tance of one string, from the fourth and fifth to the fifth and sixth.
- Try the movement several times with just the left hand. Then, when you feel reason-ably familiar with the movement, play the chords with the right-hand thumb as before,remembering that the C chord uses only five strings.
- Notice how the G7 chord seems to need to resolve to the C chord. We’ll discuss thisfurther at a later point—for now just try to hear the relationship.
After those changes are coming smoothly, try adding the F chord to complete the groupmost closely related to the C chord. Practice them in the order C, F, G7, C. Notice that the first finger covers two strings. The technique of covering more than onestring with the first finger is known as “barring,” as explained below. For now, simply turnthe finger sideways so that the pad can cover the two strings. The F chord

Read more...!
Chords are groups of notes that, when played together, make a pleasant sound. Chords areused to accompany melodies. Each chord is named for its bass note, and is made up of thefirst (bass note), third, and fifth notes in a scale. The first thing most people want to learn todo on the guitar is to play simple chords.
The first chord we learn is known as the C chord, since it is built on the bass note C.

Fingering the C chord
Try placing the fingers as in the illustration, keeping the following points in mind:
- Press just behind the fret. If you are too far back the string will buzz against the fret.
- Keep a slight curve on the fingers—don’t let the joints straighten out or give way.
- Keep the thumb behind the neck, slightly forward of the first fret. Don’t bend this joint—keep it back.
- Don’t press too hard. Accuracy is more important than force.
- When you are ready, sound the chord by sweeping your thumb across the upper fivestrings.
There is a great pleasure in hearing your first chord when the guitar is in tune and resonant.When you have it right, take the hand away and do it again from scratch. Continue untilyou can find the chord quite easily.
There is a fair amount of detail involved in the correct placement of the left hand, and goodhabits formed at this stage will pay off tremendously as you continue.
The chord can be shown graphically in various ways. Perhaps the easiest to recognize is thechord block showing part of the guitar fingerboard with round dots representing the fingertips.
 A chord block showingthe C chord A chord block showingthe C chord
Notice that the fingering is shown by the numbers at the top of the strings. Number 1 represents the index finger, 2 the middle finger, 3 the ring finger, and 4 the little finger. Strings not to be played are marked with an X. The O note denotes an open (unfingered) string. A wide variety of popular music is published with the appropriate chord blocks printed right above the melodies, making this a great and easy way to learn chords. The finger numbers shown here are for the initial learning of chords—sheet music that includes chord blocks will normally show only the dot positions, and the X and 0 markings. This is partially because chords may have different fingerings according to the situation.
Read more...!
At first we’ll concentrate on the left hand. To play the chords, simply sweep the pad of thethumb across the strings—we’ll add sophistication later. The illustration shows the basic position of the left hand. Notice that the thumb is behindthe neck, approximately behind the fret played by the first finger. Here is an excellent firstexercise to establish and strengthen the left hand: - With the thumb in a good position, hammer down your first finger just behind the firstfret of the sixth (lowest sounding) string. See how loud a note you can sound with justthe left hand.
- Leaving the first finger where it is, hammer down the second finger behind the secondfret. Be sure to be close to it, or the next frets will be difficult to reach.
- Still leaving each finger on after it has hammered, play successively the third andfourth fingers.
- Next do the same thing on the fifth string.
- Following this, play all the remaining strings, hammering as loudly as possible.
 The left-hand position The left-hand position
This is a wonderful first exercise, because it builds both strength and stretch. Don’t bedismayed if you don’t produce much sound at first—you’ll be amazed at the difference aftera few days.
The next step is to put both hands together to play a chord.
Read more...!

First, sit comfortably in an upright chair as illustrated above. I recommend using the classicalposition, with the left foot raised on a footstool or other support, because this provides theeasiest access to all parts of the guitar. The height of the footstool will vary according to yourheight, but for most people four to six inches is enough to provide good support. Adjustablefolding footstools are widely available at music stores at moderate cost and are the mostconvenient solution. However, in the early stages anything that raises and supports the footwill do.
To look at your hands, lean forward rather than pulling the guitar back. It is important tokeep the guitar upright. As you look to your left at the tuning machines, keep them aboutthe level of your shoulder; the axis of the guitar should not become too vertical.
The informal right-legposition. The sketchshows the positionfavored by the versatileLaurindo Almeida, amaster of both classicaland Latin Americanstyles.
Read more...!
Besides learning the most comfortable and practical way to hold the instrument, this chapterwill introduce us to some basic left-hand techniques. You will learn the simple chords thatare used to accompany many popular songs, and also how to make quick and easy transi-tions between them.
These are the first steps in becoming a guitarist. And, like all steps, we will break it down soyou can’t possibly make a mistake.
Playing Position
Now that you’re ready to play the guitar, it’s important to learn how to hold it in a comfort-able way. As you might expect, the different styles of playing have slightly different ruleswhen it comes to handling the instrument.
A comfortable playing position is important to provide access to all parts of the guitarwithout strain. Classical players place the guitar on the left leg raised by a footstool so thatthe upper part of the leg will support the guitar without it slipping down. The sketch ofAndres Segovia shows the position favored by most professional players. Some performershave both feet flat on the floor and use a special type of cushion to raise and support theguitar, but this is less common.
 The classical position The classical position
Most non-classical players support the guitar on the right leg. Traditionally flamenco playersposition the guitar at its widest point on the right leg. Most other styles use an informalposition resting the guitar on the right leg. Some players use a cross-legged position,but there are physical disadvantages to this, notably the concomitant decrease in bloodcirculation.
Playing in a standing position, as in stage performance, requires a strap for support. The strapis attached at the bottom of the guitar’s body to a pin and commonly attached at the top bya string tied around the bottom of the headstock, above the nut. Pins can be added to aguitar for this purpose, but this should be done by a professional repair technician.
 This sketch ofRamon Montoya,considered thegreatest flamencoplayer of his day,illustrates the tradi-tional flamencoposition.
Read more...!
With your first string in tune, it is possible to tune the rest of the guitar string by string.Here’s how:
- Put a left-hand finger just behind the fifth fret of the second string and sound the stringwith any right-hand finger. It should sound the same as the first string open (i.e., withno frets used). If it doesn’t, tighten or loosen it until it does.
- With the top two strings now in tune, put a finger behind the fourth fret of the thirdstring. When you play it should sound the same as the second string. If it doesn’t,tighten or loosen as above.
- With the top three strings in tune, place a finger behind the fifth fret of the fourthstring. Adjust it to sound like the third string.
- With the top four strings in tune, place a finger behind the fifth fret of the fifth string,and align it to the fourth string.
- Finally, place a finger behind the fifth fret of the bottom string and tune it to the fifthstring. That’s all there is to it.
Tuning seems tricky at first but it comes with practice. In general don’t be too delicate inturning the tuning keys—a very small increment won’t make any difference. Sometimes it iseasier to off-tune by an easily audible amount and then come back.
Electronic Tuning Tuning can also be made almost foolproof with electronic tuning machines, in which eithera meter or colored lights tell you when you’re in tune. The cost of these is naturally higherthan that of tuning forks or pitch pipes, but they are accurate and easy. The best kind allowyou to play a note and then watch a needle that shows whether you’re sharp or flat. String Stretch After putting on a new string, there is a tendency to believe that the string is slipping,because the pitch will drop slightly over a period of time after being tuned up. Actually thisis the string stretching, and until the settling point is reached it will be necessary to tightenthe string periodically. Professional players hasten this process by taking hold of the stringand twisting it to get the stretch out. The Least You Need to Know - The action (or height) of the strings on your guitar is crucial to making it playable.
- Changing strings is easy, but the process is slightly different for classical, folk, andelectric guitars.
- Buying the right type of strings for your instrument is important to maximize soundand playability.
- Tune your guitar with a pitch pipe or tuning fork, on a piano, relatively on the instru-ment itself, or with an electronic tuner.
Read more...!
Strings have a natural life cycle. As they are exposed to air and the oils from your fingers,they tend to lose their elasticity and eventually their ability to sound cleanly. You canforestall this process by wiping the strings clean with a soft, dry cloth after you play. Deadstrings may be revived temporarily by scrubbing with soap and water.
String Brands
Every player seems to have his or her own favorite “brand” of string. Unlike guitar brands,it’s hard to make general statements about strings. While some guitar companies have theirown name-brand strings, most do not make strings themselves but buy them from anestablished maker and repackage them. A reputable dealer or teacher should be able torecommend a good string for you. Remember also that different makers use slightly differentterminology when referring to nylon, composite, or steel strings.
Tuning
To tune your guitar, you need a pitch reference. A tuning fork or pitch pipe can be used as areference. If you buy a tuning fork (the more accurate pitch), be sure it is an E fork—not A,which is the more common type. The E note will give you the pitch for your first string.
Tuning to the Piano
Another good way to tune is by using a piano. If your piano is in tune, you can simply playeach note and quickly tune the corresponding string. 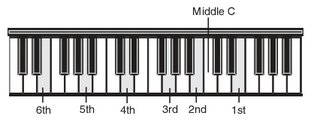
Read more...!
Just as there are different types of guitars, there are different types of strings. Here are theprincipal types:
- Nylon strings are used on classical guitars. In fact, it is dangerous to use heavier stringson a classical guitar, because the instrument is not designed to withstand the hightension they produce. The three lowest strings are made of silver-plated copper wirewound on a core of nylon strands. The upper three are pure nylon filaments.
- Steel strings are designed for acoustic folk guitars. The bass strings are wound on a coreof silk or nylon.
- Heavier wound metal strings are designed for electric guitars.
Core and winding materials vary among string makers, and you may wish to experimentwith different types to see which produces the sound you like best.
Strings are also available with different shapes or contours, from flat to fully rounded. Stringsare also sold in light, medium, or heavy gauges. This has to do with the amount of elasticityin the string: light-gauge strings are more elastic and therefore easier to play than heavyones. Again, depending on the kind of music you play and your own personal taste, you’ll beable to choose the proper string for you. It’s always worthwhile to try different types ofstrings on your instrument to see if a simple change of strings can lead to improved soundand playability.
Read more...!
When you buy your guitar, chances are that it is correctly strung, and you will be able to seeby looking at the bridge how the knot is tied. The illustration below shows the correct way toattach nylon strings to the bridge for the classical or Spanish guitar. After looping in themanner shown, the end should be trimmed so as to be clear of the soundboard. Otherwise itcould cause buzzing.
 Approximate settings for comfortable playing action  How the strings attach to the bridge For acoustic or folk guitars, there is often an arrangement of six pegs in the lower part of thebridge. The string is simply looped around the peg and then the peg inserted into its hole tohold it fast. Electric guitars feature an attachment at the end of the bridge, usually with six small pins.The loops of the strings are attached around these pins to be held securely. Jazz guitars oftenhave a raised tailpiece and have their own unique method of string attachment. At the peg-head end of the classical guitar, the string should be passed through the hole inthe white bone barrel. Then pass the string back to make a loop around itself. Finally,holding the string by the end, turn the tuning key so that the twist you have made windsover the top of the barrel and away from you. Acoustic folk guitars and electric models usually feature solid peg heads with large, steel-barrelled tuning machines. As with the classical guitar, the string is passed through a hole inthe top of the barrel, and then the peg is simply turned to increase its tension. Excess stringsshould be cut off to avoid tangling in the tuning key and to keep a generally clean appear-ance.
Read more...!
The strings form the key interface between you and your guitar. If you’ve never played astringed instrument before, it may even feel uncomfortable for a while. But with the rightplaying action, your guitar will soon become easier to handle.
This chapter introduces you to some easy solutions for the trials and tribulations of playing astringed instrument. It tells you what you need to know to make playing fun and easy fromthe beginning, and introduces the many options available to you among different types ofguitar strings. And it will making tuning your guitar easier.
About the Fingers
The first thing a new guitarist notices is that the tips of the left-hand fingers can feel soreafter a stretch of playing. This is particularly true if you’re playing a steel-strung guitar, but isnoticeable even with nylon strings.
Just as a trumpeter must develop his “chops,” the guitarist will develop calluses. It may takeseveral weeks—or even months—for these to develop. And, if you take a break from practic-ing, you may lose the calluses you’ve built up.
The Playing Action
For beginners, it is important not to have strings that are too high off the fingerboard,because this increases the necessary pressure for the left-hand fingertips to hold down a clearnote or chord.
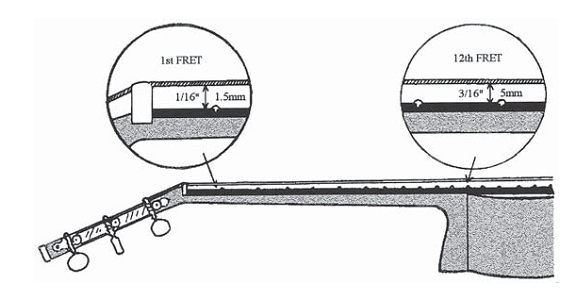
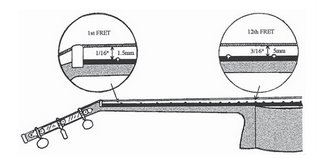
The strings are supported by detachable bones at the nut and bridge (see illustration). Thenut bone, which is slightly grooved to provide a guide for each string, sets the height abovethe fingerboard at that end. If the strings are too low they will buzz against the frets. If theyare too high, the guitar becomes hard to play, which can completely discourage you fromcontinuing.
If the setting is too high, the nut bone needs to be removed and filed down from the under-side. If it is too low, a sliver of cardboard or similar material may be inserted underneath, butthis should be a temporary solution until a new bone of the right height can be obtained. Ona classical guitar the height of the strings at the first fret will be about 1/16 in (1.5 mm).
At the bridge end, a similar adjustment can be made to the bridge bone to produce a heightat the twelfth fret of approximately 3/16 in (5 mm). The reason the measurements areapproximate is that the exact amount depends on the height of the frets and the total stringlength, both of which vary from maker to maker.
Note that these measurements are for the nylon string guitar. The metal strings of theacoustic guitar are set lower due to the greater tension, and for the sake of the left hand, steelstrings need to be as low as is practical, consistent with clear sound.
Read more...!
Remember that when you buy an instrument from a guitar store, you’re giving them yourbusiness—so they should treat you like a valued customer! This should start even whenyou’re“just looking.” Here’s a checklist of things to ask of your dealer:
- Will he play and demonstrate different instruments for you?
- Will he tune and adjust the guitar to your liking?
- Does he provide any free extras—a carrying case, extra strings, etc.—with your pur-chase?
- Does he offer repair services or additional warranties?
- Does he have a return/refund policy?
- Will he accept the instrument in trade if you decide to “upgrade” to something better?
Mail Order
At one time, most towns had a music store with a good selection of guitars on hand. Nowa-days you may have to travel miles to find a well-stocked outlet. There are, however, severalmail order dealers that specialize in guitars, often at discounted prices.
Here are some things to keep in mind when dealing with mail order:
- Make sure you’ve played the instrument—in a local music shop or at a friend’s house—before ordering one.
- Make sure you have a reasonable “trial” period during which you can return theinstrument for a refund (not just a credit).
- Pay for a reputable shipping service such as UPS or Federal Express, and insure theshipment.
- Determine who handles warranty repairs and adjustments.
- Examine the instrument carefully for damage when you receive it.
Accessories
When buying a new guitar, you should always get a good, sturdy case. Generally, there arethree types of cases available:
- Chipboard: The cheapest, and least protective of your investment.
- Gig Bag: A lined bag made of vinyl or some plastic material that gives limited protec-tion to your guitar.
- Hardshell Case: The heaviest and most durable protection you can get.
Obviously, you should go for the most protection you can afford. But never ever store orcarry a guitar outside of its case, even if it’s just a cardboard one. A case will help protect aguitar from bumps and scratches, and also can protect it against excessive humidity, sun-light, or heat, as well as other less-than-favorable conditions.
Other accessories you might consider are electronic tuners, extra sets of strings, straps, andguitar instruction books and videos. All of these items can be useful, although you don’tneed to buy them all at once. We’ll be discussing some of these items in more depth infuture chapters.
The Least You Need to Know
- Buying a guitar takes time and study.
- Be sure to get an instrument that suits your playing style and is easy for you to play.
- Shop carefully among new and used instruments, as well as local dealers and mail-ordersuppliers.
- Be sure to get a case to protect your investment.
- You can play all the music in this book on a Spanish-style nylon string guitar.
Read more...!
Guitar makers come and go but there are a couple of name brands that have been around formany decades that are known for the general quality of their instruments. Here’s a partiallisting, with some comments about them.
Japanese/Asian Makers
- Yamaha: This Japanese maker is well known for the quality of its beginner’s instru-ments. They make a wide variety of styles of acoustic and electric guitars, most of whichare copies of popular American models, although a few are original in design toYamaha. They also make a line of classical-style guitars based on Spanish models.
- Alvarez-Yairi. This is another Japanese maker that makes a slightly glitzier guitar thanYamaha, with lots of “mother-of-pearl” (actually plastic) inlays. They are knownprimarily for acoustic, folk-styled guitars.
- Washburn: Originally, Washburn guitars were made by the Lyon & Healey Company inthe late nineteenth and early twentieth centuries. The name was revived in the 1970sby a U.S. importer of Japanese guitars. They make a reasonably good line of acoustic,folk-styled guitars, as well as electric instruments.
- Takamine: A Japanese company specializing in copies of Martin guitars. Very playableand reasonably priced, they are good alternatives for those who want a Martin-styleinstrument. They also make classical guitars, including some fine handcrafted modelsunder the Hirade brand name.
- Ibanez: They are best-known for their reasonably priced copies of popular electricguitars, including models inspired by Les Paul and the Stratocaster.
American Makers
- Guild: This venerable American maker was founded in the late forties to make jazz-styleguitars, but they are best-known for their folk, acoustic instruments of the sixties. Notquite as celebrated as Gibson or Martin, Guild nevertheless makes dependable andplayable instruments.
- Gibson: The Gibson Company has a long history, going back to the 1890s. After aperiod of corporate ownership in the 1970s, the company underwent a remarkablerevival. Gibson makes acoustic, folk guitars; arch-top jazz models; and the famous LesPaul electric guitar (as well as other electric styles, such as the Flying V). Gibson hasimported less expensive Japanese-made instruments that it has marketed under theEpiphone name.
- Martin: Founded in 1833, this company still makes its guitars in Nazareth, Pennsylva-nia. Martin makes some classical and acoustic-electric instruments, but basically isknown for their large-bodied, Dreadnought (or “D”) styled guitars. The gold standardfor acoustic players.
- Fender: Founded in the early fifties by Leo Fender, this company is famed for twoguitars, the Telecaster and Stratocaster, as well as its Jazzmaster bass. Like Gibson, thequality of its instruments declined during a period of corporate ownership from themiddle sixties through the late seventies, but has recently come back. OriginalStratocasters from the fifties are worth huge sums of money.
- Ovation: Perhaps the most radical of all new guitar designs came from the Ovationcompany in the early seventies. Acoustic guitarists either love them or hate them. Theseguitars have fiberglass bodies with a bowl-shaped back, although the soundboard orface is made of wood. The sound hole design is also eccentric, often featuring (depend-ing on the model) several small holes in the upper left-hand bout of the instrument.
Spanish Makers
- Alhambra: Good-quality guitars from the province of Valencia, long a center of classicaland flamenco guitars.
- Cordoba: In spite of the name, these traditional Spanish guitars also come fromValencia.
Read more...!
To save money, inexpensive guitars are usually made of lesser-quality woods. You will rarelyfind an inexpensive instrument made of solid wood. Instead, laminates (a fancy name forplywood) are used. The appearance will be good, because quality woods are used to for theouter layer, and these guitars are very sturdy and unlikely to crack; but the sound of aplywood guitar is rarely as resonant as one made with solid woods. Sometimes the top, orsoundboard, will be solid with laminated wood for the sides and back, which is preferable toplywood throughout.
The best classical guitars have sides and back of Brazilian or East Indian rosewood. The topsare of spruce or Canadian cedar with even spacing between the anular lines of the grain. Theneck is usually made of Spanish or Honduras cedar, and the fingerboard of ebony. Folk oracoustic guitars can be made of spruce, maple, rosewood, or mahogany, each having adifferent characteristic sound. Folk guitars also use ebony fretboards, although cheaperinstruments may use a plastic substitute. As well as costing more, the solid wood guitar willneed more care since it is more susceptible to changes in temperature and humidity. Exces-sive dryness is a particular enemy of guitars.
At the very minimum, if you are playing an acoustic guitar, try to get a guitar with a solidwood face or top. This will give you the advantage of improved sound. The laminate body,meanwhile, will be better for you as a beginner because it is sturdier—less likely to crack orscratch with mishandling—and overall has less effect on the instrument’s performance.
For electric guitars, it doesn’t much matter what is used to make the body. In fact, the ideal isto have a strong, nonresonant body—the opposite of what you’d like in an acoustic instru-ment. Plywood, plastic, fiberglass—anything strong can be used. The body is more importantfor its decorative value—i.e., how it looks on stage—than its composition.
Read more...!
A good used guitar can be an excellent value. Many people buy instruments and thendiscover that they simply lack the time or capability to play them. You can sometimes pickup a real bargain by scanning the local want-ads.
Here’s a checklist for evaluating a used guitar:
- Make sure the tuning machines all work and turn easily.
- Check the body for cracks. Any crack, no matter how small, is a bad sign.
- Check the neck for warping. Press a string down at each end of the fingerboard. Itshould touch all the frets.
- Try playing a few notes and chords; see if the guitar responds easily.
- Ask the owner if he/she is the original owner. Determine if the instrument has everbeen repaired.
Read more...!
It may be wiser to borrow or rent an instrument for the first few months, until you deter-mine your level of commitment to playing. On the other hand, an old, battered, poorlyconstructed instrument may be so difficult to play that you’ll be discouraged from learning.
It’s a good rule of thumb to purchase the most guitar you can afford. Generally, guitars holdtheir resale value—some in fact grow in value over the years. Buying a very cheap guitar maybe self-defeating, because it may not suit your playing style or be so poorly made that it isdifficult to play.
Acoustic vs. Electric
Many young players start out on an acoustic instrument because they can’t afford a good-quality electric instrument and amplifier—or their parents can’t stand the noise made by abeginning electric guitarist! Learning on an acoustic instrument will probably be a goodexperience for most players, even those who only aspire to playing speed-metal. But remem-ber that the two instruments are quite different, and that you’ll need to master a new set oftechniques once you start playing an electric.
Read more...!
As with all major purchases, it is important to do as much research as possible beforehand.Sources of information will be other players, teachers (local colleges may have a guitarprogram), and for those with access to the Internet a host of manufacturers’ advertisements.
There are also guitar newsgroups on the Internet, which offer the opportunity to read theexperiences of others and to ask for opinions.
Remember from Chapter 2 that there are several types of guitars made to play different stylesof music. Before shopping, listen to different players and determine what kind of instrumentyou would like to play. While you may be able to learn on any instrument, it is better toselect one that closely approximates the style you want to learn.
Read more...!
Buying a guitar can be an intimidating experience, particularly if you aren’t yet a proficientplayer. How can you choose the right instrument if you can’t even play it? But, the fact ofthe matter is there are some practical techniques you can use in selecting and buying anaffordable instrument.
This chapter outlines some basic buying strategies that will work for you. These include pre-shopping tips: distinguishing among different types of guitars (drawing on the informationfrom Chapter 2), fitting an instrument to your body type (and style of music), a brief over-view of the common guitar brands, and whether to buy from a local music shop or by mailorder.
Even if you could afford to own Eric Clapton’s Stratocaster—and generally speaking youshould buy the best guitar you can afford—you may have to be practical. This means buyinga guitar . . . that won’t empty your savings account. This chapter shows you how.
Read more...!
While most of you will choose from among the four major types of guitars we’ve alreadydescribed, there are some other noteworthy types of guitars that have been or are available.
- Bass Guitars. Perhaps the most popular guitar variant is not really a guitar at all—it is anelectrified version of a standup bass, designed to be held like a guitar. Introduced in thefifties by Fender, the electric bass has become a standard component of all rock bands.It is tuned and played like a standard acoustic bass—so it’s really a member of the violinfamily. Recently, acoustic guitar makers have designed acoustic bass guitars that areheld like an electric bass but are intended for playing softer music.
- Smaller Instruments. Three-quarter-sized or half-sized guitars are made, often forchildren. The Martin Guitar Company recently introduced a specially sized guitardesigned for women players, who tend to have smaller hands than men.
- Acoustic-Electric Guitars. This simply describes an acoustic guitar with built-in electricpickups, designed to be played through an amplification system. These are particularlyattractive to people who like to play folk-style music, but the instrument needs to beheard in a club setting.
- 12-String Guitars. These large-bodied, double-strung guitars were much favored by bluesplayers because of their loud volume. The strings were tuned an octave apart, giving theinstrument a booming bass sound.
- Guitar Synthesizers. These instruments enable guitarists to enjoythe wide world of sounds available through synthesizers. Theyfeature guitar-like construction and are held and played like aguitar, but actually they contain or connect to a synthesizer,which creates a variety of sounds.
There are also a wide variety of other guitar types—from tenor guitarsto harp guitars—that were popular at one time or another, althoughthey are rarely played or heard today.
Read more...!
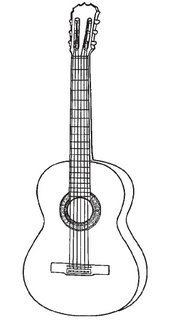
This is the type of guitar that developed from the earliest forms of four-and five-stringed instruments, reaching its final form in the earlynineteenth century. In addition to being the type of guitar used for thesolo“classical” repertoire, the Spanish or classical guitar is used for theaccompaniment of folk songs, for the songs and dances of LatinAmerica, and for the flamenco music of Spain. Throughout Europe ithas long been the favorite accompaniment instrument for love songsand serenades.
 Traditionally the sides and back of a flamenco guitar differ in that they’re made of cypresswood, which is distinguishable by its yellow color and lighter weight, but this is not alwaysthe case today because some of the great flamenco players prefer hardwood. Traditionally the sides and back of a flamenco guitar differ in that they’re made of cypresswood, which is distinguishable by its yellow color and lighter weight, but this is not alwaysthe case today because some of the great flamenco players prefer hardwood.
Classical guitars usually have a slotted peg head and are strungwith nylon strings. Generally they are smaller than acoustic orelectric instruments. The neck width is greater than on acoustic orelectric guitars to facilitate the intricate left-hand work demandedin classical compositions.
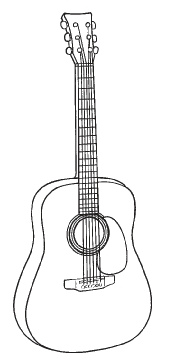
Although the term “acoustic” really applies to any non-amplifiedguitar, it is commonly used to describe the steel-strung guitar usedin country, folk, and blues styles. The steel strings give morevolume than nylon, and also have a “brassier” sound.
Acoustic guitar players can play with their fingers (as do classicalplayers), sometimes adding metal thumb and fingerpicks toenhance their sound. Others strum across all the strings—or playcomplex melody lines—using a flatpick (also called a plectrum).
The acoustic guitar has a beautiful rich sound in the hands ofplayers like James Taylor, John Renbourne, Leo Kottke, and manyothers. It works well as an accompaniment instrument, and thebest players also use it for solos and improvisations. However, forintricate solo work it is somewhat harder to play than the Spanishguitar.
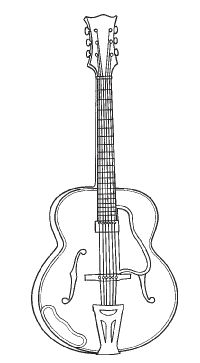
This type of guitar is normally played with a plectrum, and represents a transition fromacoustic to electric guitar, because the guitar itself has some acoustic property althoughnowadays it is normally amplified. Although a component of the rhythm section of earlyjazz groups where its distinctive “chunk” sound would cut through and be heard withoutamplification, this guitar was also used extensively for melody and solo work, an examplebeing the work of great players such as Django Reinhardt.
Distinguishing features include the violin-like f-holes which replace the circular sound holeof the traditional guitar. Often jazz guitars are larger in size than classical or acoustic guitars,and they usually have arched tops and backs, like a violin. This is said to improve theirsound projection. Pickups are now built into the guitar, as are volume and tone controls.
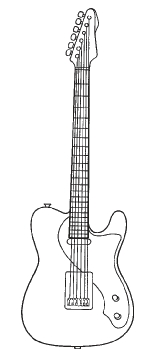
The pioneering guitarist Les Paul was a technical as well as musicalwizard. He is famous for multitrack recorded performances, and hisdevelopments on the instrument itself led to the extensive use of solid-body guitars with no innate acoustic resonance. Used for chords andlead in contemporary rock groups, the solid-body guitar has no sounduntil it is plugged into an amplifier. The electronic sound from pickupsis processed in inventive ways for special effects, including deliberatedistortion. The result is a new creation that has a fingerboard andstrings but acoustically shares little with the traditional guitar.
Read more...!
Some other terms you might hear when people are discussingdifferent types of guitars are:
- Fan Bracing: This is a style of internal construction com-monly used on Spanish guitars. It is considered essential tothe production of fine tone, and patterns very slightly fromone maker to another.
- X-Bracing: This is the style of bracing commonly used on today’s acoustic guitars. It isdesigned to withstand the high tension of steel strings.
- Arch Top: This refers to a curved or arched (as opposed to flat) top. Arched top instru-ments are said to have a warmer sound, like a violin.
- Solid Body: This is a type of construction in which the body of the instrument is a solidpiece of wood, fiberglass, or other material. The body of the instrument has no acousticresonance, so that, without amplification, the instrument produces only a thin, barelyaudible sound. Hollow-body instruments have a sound chamber (like an empty box)which amplifies the sound.
Read more...!
With so much variety it becomes necessary to look at the various types of guitar and toexplore the best uses for each. Before going shopping it is obviously important to decidewhich style appeals to you the most, and which guitar will serve you best.
- Classical: If you’re interested in playing classical music, you’ll want to play a Spanish orclassical-style guitar.
- Flamenco: For flamenco, a Spanish-made instrument is best.
- Folk/Traditional/Blues: For these styles, the standard acoustic guitar is the best choice,although some folk players prefer the softer sound of the Spanish classical guitar.
- Jazz: You can play either an acoustic or electric instrument, although many jazz playersprefer a special, large-bodied hybrid instrument called a hollow-body electric.
- Rock: An electric guitar is mandatory for the hard-rockin’ player.
Read more...!
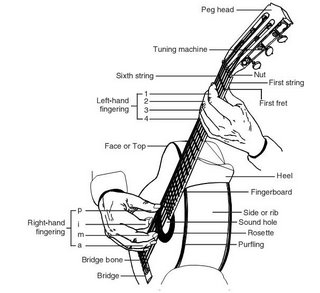
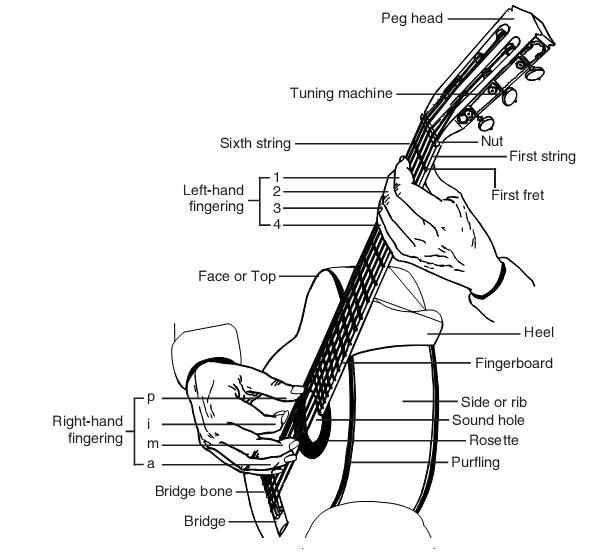
Before discussing the types of guitars available, it’s important to understand the commonnames for the various parts of the guitar. The accompanying diagram shows these partsclearly, along with names for the fingers of each hand.
The peg head is found at the top of the neck of the guitar and holds the tuning machines orgears that are used to tune the strings. On classical guitars, this peg head is usually slotted; onacoustic, jazz, and rock guitars, it is usually solid. No matter—it performs the same function.
The nut is found at the bottom of the peg head and top of the guitar neck. It is made of boneand holds the strings in their proper position. The height of the nut also helps determine thestring height or action of the guitar; classical players generally go for a higher action, whileelectric and jazz players like it lower.
The neck of the guitar contains the fingerboard. Across the fingerboardrun frets. By placing a finger against a fret, the player is able to raise thepitch of a string to play individual notes or chords.
The back of the neck, where it joins the body of the guitar, is called theheel. This may appear in a variety of shapes, and on very fancy guitars itmay be carved with animals or human faces. It simply hides the jointbetween the neck and the guitar.
The front of the guitar is called the face or top. Around the edge of theface, there is usually purfling (often called binding) that hides the jointbetween the face and sides; similar binding appears around the back of the guitar. The face of the guitar usually features a round or oval sound hole (on acousticinstruments); sometimes f-shaped holes are used on jazz guitars. On some guitars, a fancyinlay called a rosette surrounds the sound hole for decorative purposes.
After the strings pass over the sound hole, they cross a slotted bridge bone, which directs thestrings down to where they are fastened on the guitar’s bridge.
While different types of guitars may have different features, these are the basic componentsyou will find on most of them.
Read more...!
|
|
|
|